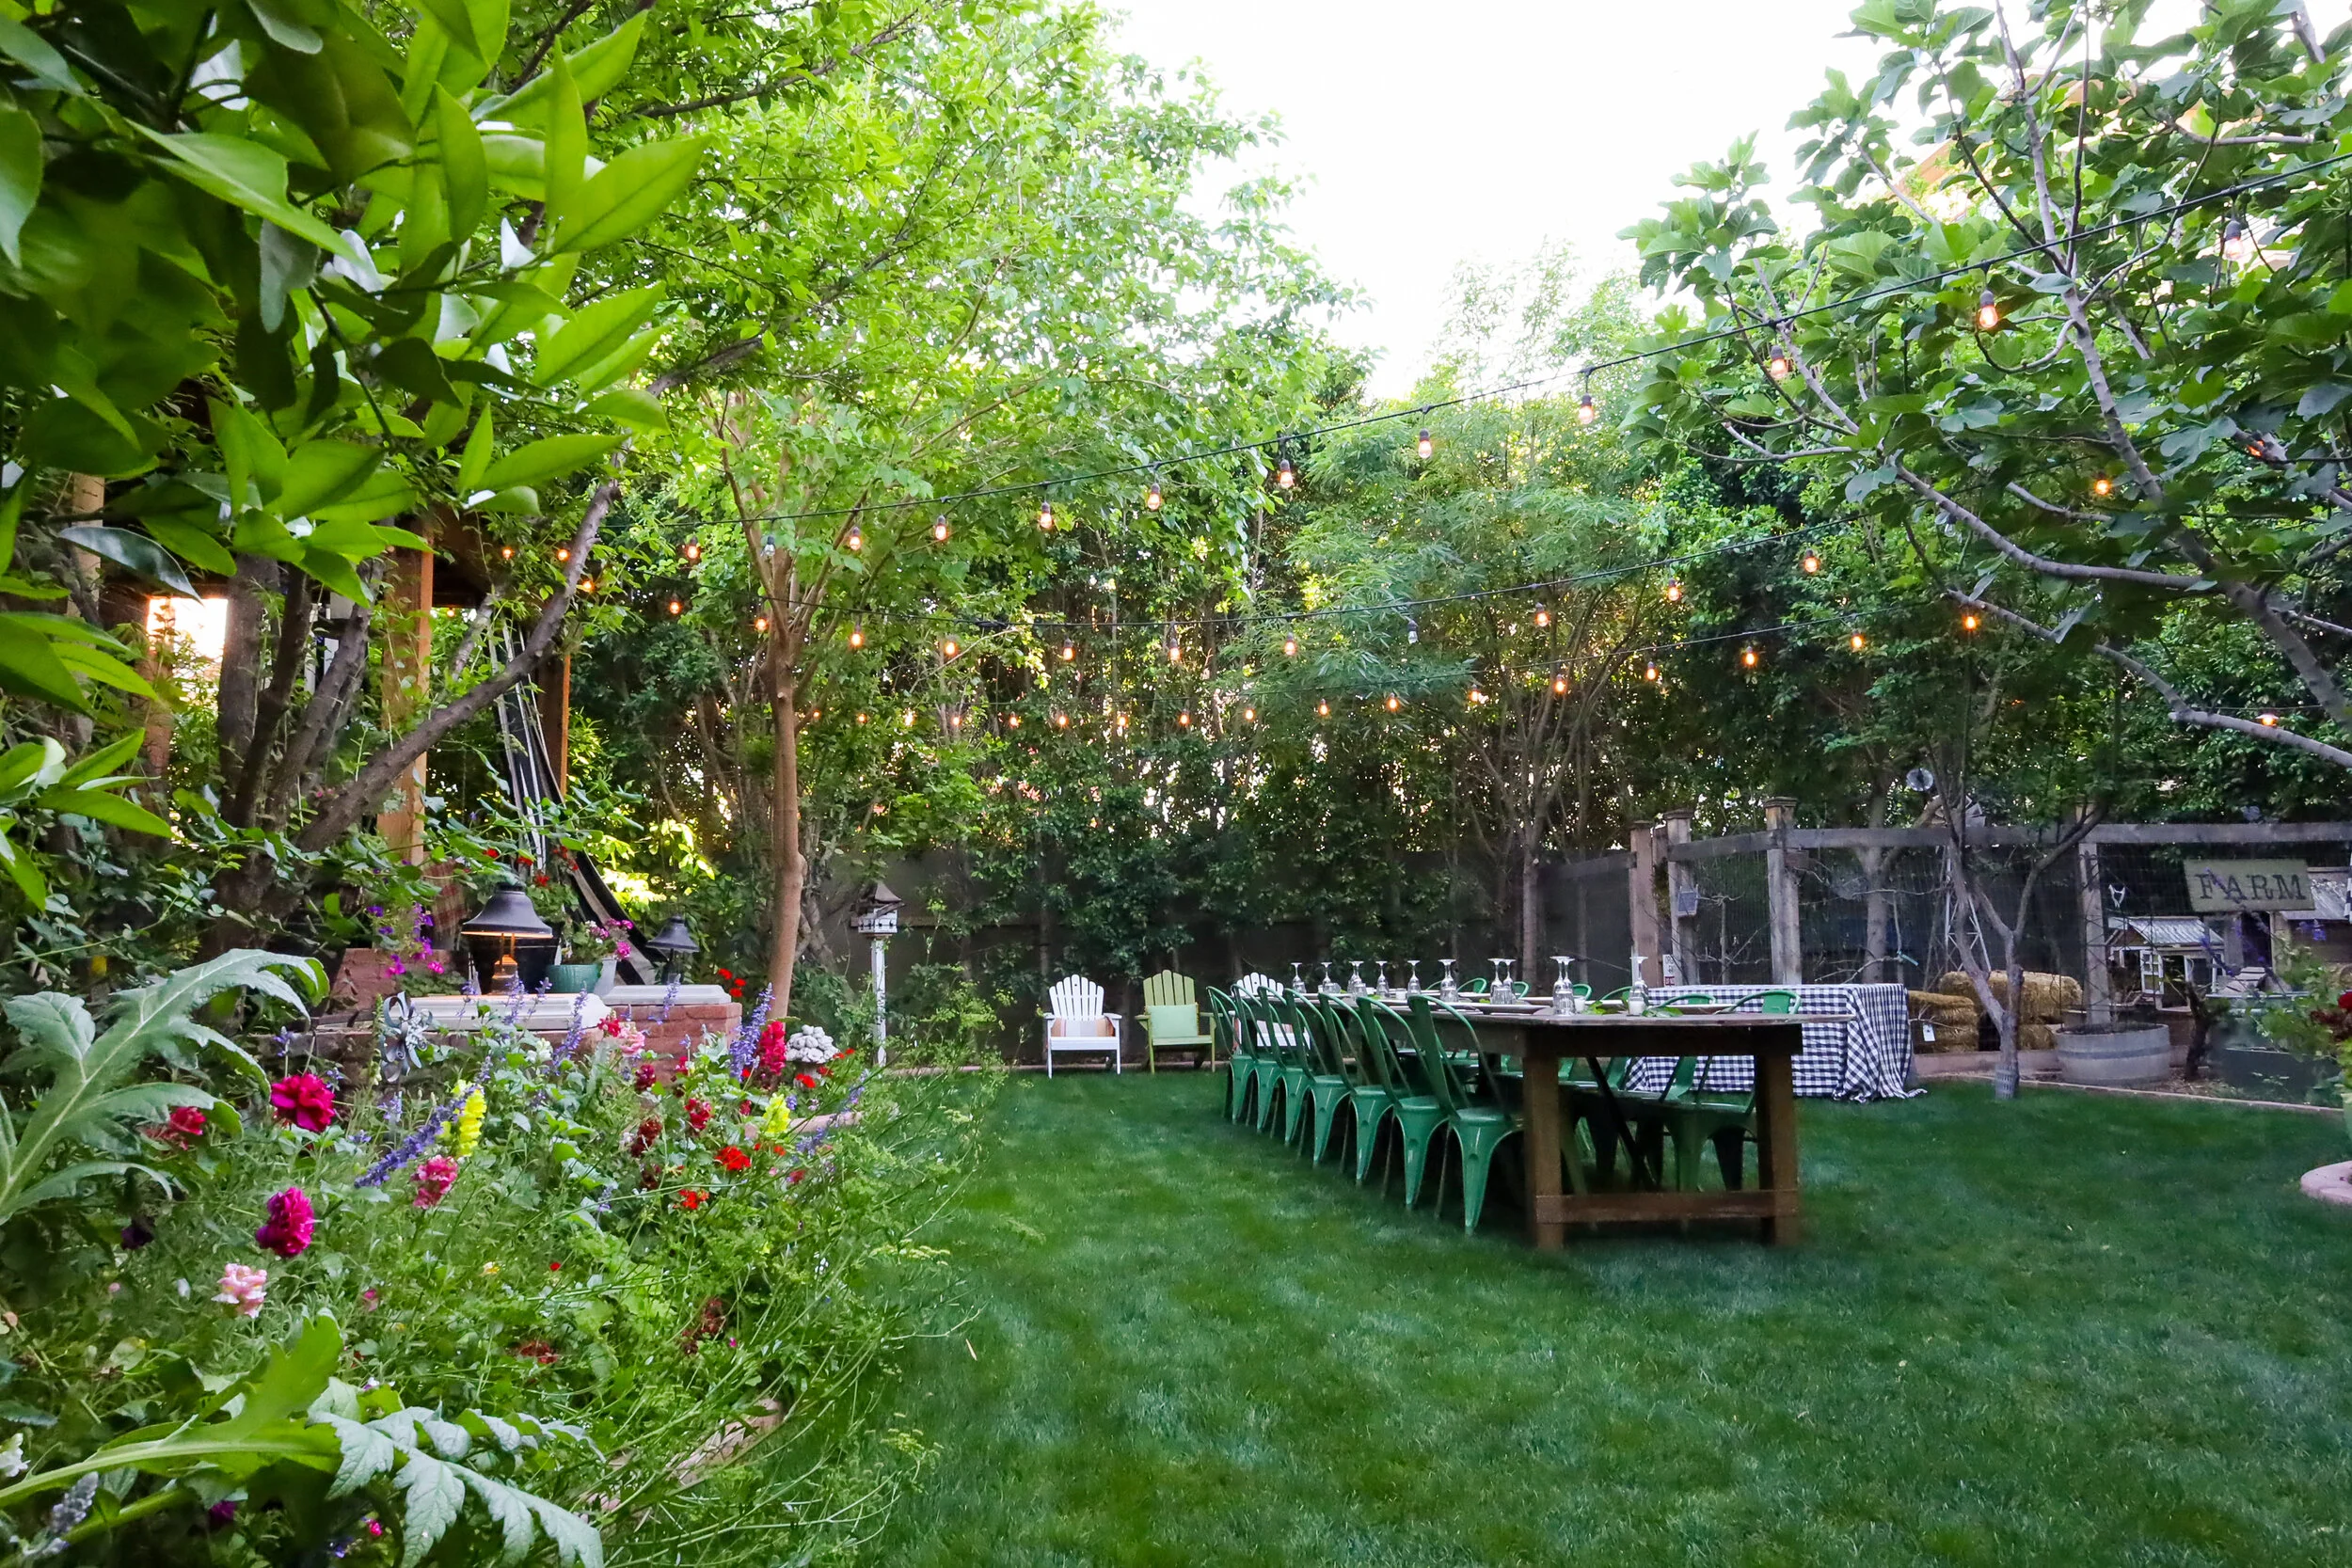
Friday, May 17, 2013

Dinner at the Coop-Spring 2013

Dinner at the Coop this spring was an extra special treat,
full of farm to table goodness!
 
We started out with a freshly picked mint tisane.
Served with our fresh homemade goat cheese and topped
with our own herb jelly.

 
We were having a bit of a heat wave, so we moved the dinner into
the back lawn where it is cooler, which ended up being a piece of wonderful providence.
 
 
The first course was fresh picked steamed artichokes served with garlic aioli and a chipotle hollandaise.
 
 
The second course was a fennel, citrus with avocado salad.
The fennel came straight out of our raised beds, citrus is at the
end of it's season, so we combined all the different types we had left: 
Blood orange, navels and a grapefruit.
The combination of citrus gave a fabulous depth to the salad.


The third course was a pasta carbonara made from Hayden Flour Mill's,
 locally grown heirloom Italian wheat flour and served up with our
fresh pasture raised organic eggs. It was delish...freshness is essential;
that makes all the difference.

 
Our fourth course was organic pasture raised roast chicken with root vegetables, 
we not only raise the chicken organically but processed them too and the root veggies were
more BOHO home raised goodness.

 
The fifth and final course was a lemon olive oil cake topped
with our own homemade lemon brown sugar marmalade
and served with our own vanilla bean ice cream made
with eggs yolks from our happy hens.

 
Friends were made and our community grew.


people were inspired to grow their own food,


and that is why we do this...to inspire others that it can be done!
Food brings people together in a special way that nothing else can.
It builds our community and cements friendships together.


There was a lot of love in the kitchen.


My hubby/chef and sous chef Sloan both work in the financial industry by day
but by night they are creative cooks who love to feed people good food!


The lighting we install this fall made everything
glow a magical glow.


A delightful evening was had by all!
 
Wishing you a weekend full of family, friends and of course,
delicious food.
 
Bon Appétit!
 
Again... a big Thank you to Karen Scheffe of Elan Photographie
for these amazing photographs!


Monday, May 13, 2013

The Artichoke Harvest

 
It is artichoke season in the Valley Of The Sun
and our harvest is abundant this year.


Artichokes are part of the thistle family and a perennial.
These plants were planted last October, which is the time to put
them in the ground, if you want a good harvest.
We keep harvesting and they just keep producing!
If you don't harvest they will go to flower like these 
 
 
and once it goes to flower, it signals to the plant to die.
I always let a few go to flower because they are so beautiful
but the rest I try to keep alive.
 
We have been eating artichokes non-stop
and our preferred method of preparation is to steam.
Here's how we do it!
  
Steamed Artichokes
 In a large pot, put a couple inches of water,  clove of garlic,
a couple slices of lemon, and  bay leaf.
Insert a steaming basket. Add the artichokes. Cover.
  Bring to a boil and reduce heat to simmer.
  Cook for 30 minutes.


Then drain, cut in half, remove the fibrous middle
and serve with garlic aioli, hollandaise (we use chipotle hollandaise)
or clarified butter.
And just eat the whole thing!

Bon Appétit!

 
Thank you to Karen Scheffe of Elan Photographie
for these amazing photographs...what a gift you have!


Saturday, April 20, 2013

Fresh Herb Jelly

Here is the recipe for the Fresh Herb Jelly that I made today
for the edible education class ,"Jelly's Last Jam" 
at the Old Town Scottsdale Farmers Market.
 
It tastes fresh and is so easy!
 
We served it today on Mediterra baguette thinly sliced, with fresh locally handmade burrata
from Gina's Homemade, topped with the fresh herb jelly and sprinkled with
fresh finely chopped dill from McClendon Select
All are local vendors at the Old Town Market.
Fresh Herb Jelly
2 cups chopped herbs
(parsley, mint, dill, oregano, savory or you can
make your own combination--be creative)
1 ½ cups organic apple juice
1 cup water
1 cup white wine vinegar
1 package of powder pectin
5 cups sugar 
Combine herbs, apple juice, water and vinegar-bring to a boil.
Cover and let steep for 15 minutes.
 
Strain herb liquid through strainer lined with cheesecloth.
Take herb liquid and place it in a clean saucepan.
Whisk in pectin until dissolved.  Bring to a boil over high heat,
Stirring constantly.  Remove from heat and skim any foam.

Add the sugar all at once and bring back to a boil.
Oncethe sugar is disolved remove from heat. 
Pour jelly into jars, leaving a ¼ inch head space-make sure rim
Of jar is clean.  Place lid on jar and screw band down
but not too tight.
Place jars in a 250 degree oven for 15-20minutes to seal.
Cool for 12 hours, tighten bands and store.
 
makes 6 8oz jars
Shelf life 6 months
 
Enjoy the weekend!

Thursday, April 4, 2013

What Every Farmgirl Needs...

A Canning Pantry!
 
With our evolving urban farm, all the canning, jam making, 
pickling and fermenting we do.
 
We have outgrown this little 1951 house's storage.
With an older house that has closets that are
two feet by three feet, you have to be really smart
about how you use your space.
 
Unfortunately, here in Phoenix, homes do not have root
cellars. Don't even get me started on how crazy this is,
we are the ones that should have them and basements too.
When you have summers that are 115 degrees and
six feet into the earth it stays a constant 56 degrees.
But I digress...
 
We've had this little closet next to our carport door.
We really only used it for purses, keys and
the occasional sweater. 
but behind this closet was a large outdoor storage closet
that would store all those items you need but not everyday;
ice cream makers, paella pans, roasting pan, chafing dishes,
griddle...you get the idea.
A few years ago we added a pantry into our laundry room, which helped,
 but this space is limited for the amount of items we put up.
 
Then at Christmas time, when I was going
into the outdoor closet multiple times a day.
It dawned on me...why don't we knock out the wall between the
two closets and make one big indoor closet?
 
It is funny how you can design spaces for others,
but in your own home, you can live with such a poor
use of space for years and it did not even phase me!?!
It is like the shoemakers children having no shoes.
 
So last week we started fixing the problem.
 
Here's the wall riped down in between the two closets
 and the outside door being framed in for a window.
And now, where we are at...
The window is now in and trimmed out, almost all the bead board is up. 
The vintage pink door that I found at Sweet Salvage, was
exactly the right dimensions with all the original hardware
 including hinges, is hung.

I am going to leave it this crazy chippy pink color...
I love it and so does my inner Grandma. :)

So now all we have to do is finish up the bead board, figure out
flooring, put up the trim and baseboards and then,
design custom shelves that will hold all the different size kitchen
items, along with all my canning supplies, plus a spot that we
can put our big huge fermenting crocks and have them in the dark.
 
This is where I need to get super creative with our space planning
because every square inch counts.
 
I'll let you know what I come up with!
 
We have just a few spots left for
Brunch at the Coop
this
Saturday, April 4
9:30-11:30
tickets available here.
 
Also
 
Chicken 101 Class
Taught by my friend and chicken mentor, Jim Dennis.
If you are interested in keeping chickens,
this is the class for you!
Sunday, April 14
1:30-3pm
Register for the class here.


 Have a wonderful weekend!


Wednesday, February 27, 2013

The Evolution of the Farm-Part 1

Spring has sprung on the farm...
And spring ushers us into a new season...Our winter is done and with
that all the hard labor we have been doing for the past four months
 planting, pruning, changing and upgrading our little farm. 
 
A home is a living organism, that is continually growing,
changing, adapting and it is no different with a farm.
 
Things that worked when we were younger no longer works now.
This is how it is with our coop....Our chickens have historical free ranged
our whole half acre back yard.  This is fine when you have a couple chickens
but last year we decided to grow our flock so that we could sell our eggs
and cover the cost of our organic feed. 
It's not a money maker for sure but it is a way to be sustainable.
 
With more chickens roaming we decided that a barrier needed to be erected
 so the chickens could be contained when we needed them to be. 
 
Like while we're eating Thanksgiving dinner and a chicken jumps up on the table...
this is nothing strange to our little family but to our extended family
who do not hold the same "urban farming" convictions,
 they are always a little suprised. 
 
*disclaimer*
We were eating Thanksgiving dinner outside,
I do not let our chickens inside the house.
Just in case you were wondering.:)
We walled off the whole side yard. 
Keeping it very natural and open but it still defines the space. 
For the gate we used a wooden screen door.  They girls spend the morning in this area,
eating their feed, bugs, scraps and laying their eggs within the enclosure. 
I have found it helpful with the daily Easter egg hunt,
they just don't have as many different spots to lay their eggs anymore. 
Which is an unseen benefit of the enclosure. 
Then in the afternoon, we let them out to range and as the sun goes down
 they put themselves to bed, back in the coop!
 We moved our baby chick house/brooder into the enclosure too.
The girls like to hang out beneath it...who knows why?!
  The view from inside the enclosure. 
 The early evening when the girls are going to roost.
The glow is coming from their coop's vintage crystal chandelier. 
 for all the work these girls do for our family,
I thought the least we can do is give them a little crystal beauty.
Rustic and refined...just like their keeper.
Here is the view from the side next to our guest house.
Can't wait for the grape trellis to leaf out again and
mark the side entrance with an arch of green. 
  The girls fight over their favorite laying box...
they have four but they all like to use the same one. 
All this beautiful spring weather has their egg production going
through the roof!
 
I am looking forward to the apple tree blooms, the bees buzzing
and all the trees leafing out.  Spring is a wonderful but bittersweet
time in the desert because we know soon enough, it will be 100 degrees.
 
Between posts you can keep updated on the farm
via
 Instagram or FB.


Tuesday, January 22, 2013

Moroccan Preserved Lemons

After the five day deep freeze out here in the West.
I have bowls and bowls of lemons that need to be used.
Besides freezing lemon juice, making lemoncello, 
lemon curd and lemon marmalade. 
 I like to make preserved lemons.
It is really easy, all it takes is lemon juice and course salt.
 
 
 Scrub the lemons and dry them off well.

 
Cut off the little piece where the stem attaches to the fruit
 
 
 make an X shape cut two thirds of the way down the lemon.
 
generously fill the X with French Grey sea salt.


Put the salt-filled lemons in a sterile wide mouth quart mason jar. 
 I use a wooden dowel and push the lemons down firmly so that the juice is released.  Keep layering the salt filled lemons in the jar, until you reach the top. 
Once the jar is filled, squeeze lemon juice on top till all the lemons are cover and submerged.
 
Then cover and let sit overnight. 
The next day shake the jar to get the juice and salt mixed and leave on the counter repeat shaking 
for the next few days.  Once the juice starts to go from cloudy to clear store in a cool dark place
for about a month. Then they are ready to rinse and use. 
You can keep them in your fridge for six months.
 
 
They are wonderful chopped up in a salad dressing or used in a roast chicken.
 
My kale and quinoa salad recipe uses these preserved lemons.
 
Bon Appétit!


Tuesday, December 11, 2012

Just a Peek...

Into my world these days...When we left the farm for nearly a month this summer,
I knew when we came back there was going to be some work to do. 
What I did not know was how much time and energy this work
would take but now that we are getting closer to the finish line
I am starting to enjoy the fruits of our labor,
along with seeing the light at the end of the tunnel!

I'll just give you a glimpse into part of what is happening on the farm.
Our front yard!

We have moved into the front...
In our continued desire for sustainability and our need to provide
fruit for our growing jam production.
 I designed our edible landscape to look like any other traditional front yard,
just using edible trees and plants in a non traditional manner.
I also wanted to use some salvage pieces that I have collected through the years.
our front entry and gate
(found at Sweet Salvage, of course)

After putting in our hard scape, we now have 18 fruit trees out front,
including plums, peaches, apricots, and apple.
And next month when the bare root fruit trees come in, we will plant at least 8 more
as a fruit tree hedge.
 Plenty of roses, (food for the soul and for our rose petal jelly),
herbs, artichokes, cabbages, lettuces, blackberries were planted.
our new farm entrance for events and tours.
(and yes, this gate is from Sweet Salvage too)
 
We've almost completed the front yard, just a few more details to finish up,
and our new and improved chicken coop is almost done too. 
I'll give you a tour of both when we are done.
 
Hope you are enjoying the beauty of the season!
 
Related Posts Plugin for WordPress, Blogger...